The Walk-in Gun Safe Project
With all the stories about gun safety that we’ve been seeing on the news lately, it made me remember one very interesting project a friend/client of mine decided to take on. Steve and his wife just purchased their new dream home in North Carolina which had a massive basement.
He was big on gun collecting but decided to leave his previous gun safe at his former home because of the cost it would be to move a 500 pound safe cross-country.
Buying a new gun safe was an option but with Steve’s growing collection and not wanting a standard gun safe that a NORMAL person would use, he decided to build a walk-in safe in a section of the basement. I was in the area on a business trip, so of course I wanted to check things out!
 The designated space in the basement was in the corner so only two new walls would need to be put up. Steve had previously added on a wine cellar room at another home so he figured this project wouldn’t be much different.
The makeshift plans were already made up when I got there. We headed to Home Depot to get most of the material.
Got a little sidetracked there as they had a major DeWalt tools sales going on and I ended up picking up the DW715 compound miter saw I’ve had on my “want” list for a while now.
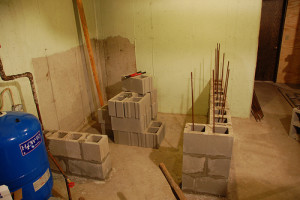
Anyway, after loading up on rebar, grout, and about 70 cinder blocks, we headed back in a pickup with a rear bumper that almost scraped the road.
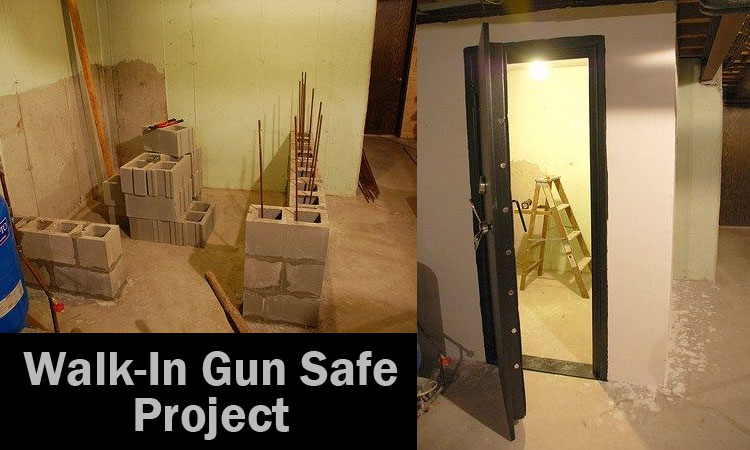
Back in the basement, we laid down the bottom row of blocks and drilled holes in the floor to support the rebar that would go up the sides of the walls inside the cinder block cavities.
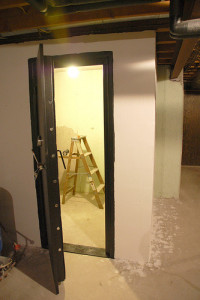
Once the walls were built up to the ceiling, my time there had come to an end but Steve kept me updated on the rest of the project. He had ordered the safe door from VaultPro USA, a monstrous 550+ pound piece of steel with ceramic poured inside the door, and had a total of four people get it put into place. Large lag bolts were used to attach the door frame to the walls.
 Once the outer walls were finished, the ceiling was put in. For this, three layers of cement board (fire rated) were screwed into the floor joists above.
Shelving was next and since they would not be adjustable like many gun safes have, Steve spent a full day planning the layout to get things just right and allow for future racks being added. 2x10s were attached to the walls at various heights using concrete screws.
Steve had previously notched out some of these shelves to act as barrel racks. Finally, all the shelves were stained and sealed since he knew everyone would want to check out his gun safe room. The finishing touch was gluing on soft felt in the barrel racks to prevent any scratching of rifles.
All in all, it’s a very cool project if you have a firearms collection that has outgrown your current gun safe. Personally, it’s not something I would need but it would definitely add to the resale value of the home considering how easily the “safe” could be converted into a sealed wine cellar.